
Mine is a stylised rather than realistic style of painting and my approach to NMM is pretty basic. I wanted to give a feel of the model's armour reflecting the colours in it's environment. My assumption is that the armour will reflect warm colours from the ground below and cool ones from the sky above. It's the same basic theory applied to painting a simplified chrome effect, the sort of thing so popular in 80's airbrush artwork. The look I was aiming for was for something far subtler but this provided the starting point from which I developed my ideas.
The colour palette for the armour was picked directly from the diorama's base. I'd experimented with a NMM effect on some of the bits and pieces attached to the monoliths and liked how things turned out so I decided to approach the armour in the same way.

Colour Palette
All the colours used are from Games Workshop.
All the colours used are from Games Workshop.
Base colour/shade:


Calthan Brown & Devian Mud Wash
Shade/accents:

Calthan Brown + BlazingOrange
Mid tones:


Calthan Brown + Ice Blue + Codex Grey
Highlighting:

Mid tone mix + IceBlue + Skull White
Final highlights:
Skull White
Painting guide.
As always what you will find here is an explanation of how I approached a particular painting challenge rather than a definitive guide on the only or best way to do it. I almost always paint by building up translucent layers. I try to keep the paint layers as subtle as I can to create a smooth transition.
Step 1 Base colour/shade.
The choice of brown is vital to the finished look of the mini. I could have used a warm grey but I wanted to have an earthy feel to the colour palette. The whole mini was base coated with Calthan Brown and then given a light wash of Devian Mud to help pick out the detail.
Step 2 Mid tones.
This is where all the interesting stuff happens with the colours. The mix of the brown base colour with ice blue gives all sorts of interesting variations and its here that the transition from warm to cool happens. Broadly speaking I add blue and a little grey to the brown and gradually work up in layers to the lighter/cooler mid tones. Each layer will contain a little more of the blue/grey in it than the last but it's important to keep some brown in there. Only the lightest highlight layers will have no brown in the mix at all. The combination of blue/brown in the mix keeps the colours from becoming too bright and artificial looking. Some of the best NMM I've seen has been created using a very narrow and almost 'muddy' palette of colours and it is this that I was trying for.
The introduction of a small amount of codex grey into the mid tones helped to stop the brown/blue mix taking on a greenish tint. In a few places there is a little scorched brown added to the mix. This gives some mid tone areas an almost purple tint. The greenish and purple tints I am talking about are very subtle but their presence gives a greater depth to the colour range and make the armour more interesting to the eye. The overall visual impression of the finished armour is one of a blue/grey colour with warm shadows.


Step 3 Highlighting.
As I worked up from mid tones to highlights I began adding white to the mix up to pure white for the very finest highlights. To give a shiny/reflective look to the armour the final highlights need to be kept as fine and sharp as possible. There are also a few very tiny dots of white to create the effect of the armour glinting. I always work with diluted colour - it is far more affective to build up the final highlights with a few very subtle applications.
To get a bit of interest into the shadows there are some reflections/glints built up with a Calthan Brown + Blazing orange mix.
Colour Palette - Gold/Brass
The gold/brass areas were created using the same stages and approach as mentioned above but with a different colour palette. Tiny touches of Ice Blue & Blazing Orange enhance the shiny/reflective effect.
Base colour/shade:
Calthan Brown
Mid tones:

Calthan Brown + Iyanden Darksun
Highlighting:
Iyanden Darksun + Skull White
Accents/Glints:

Ice Blue & BlazingOrange
UPDATE 29 June 2012
I've put together an illustrated guide to painting NMM Copper
as an expansion to this guide.
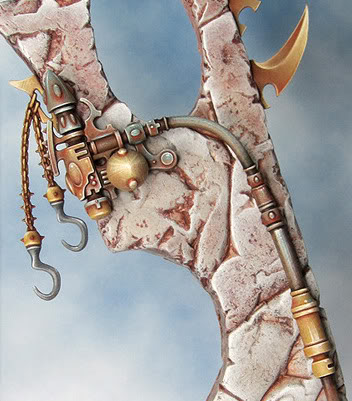
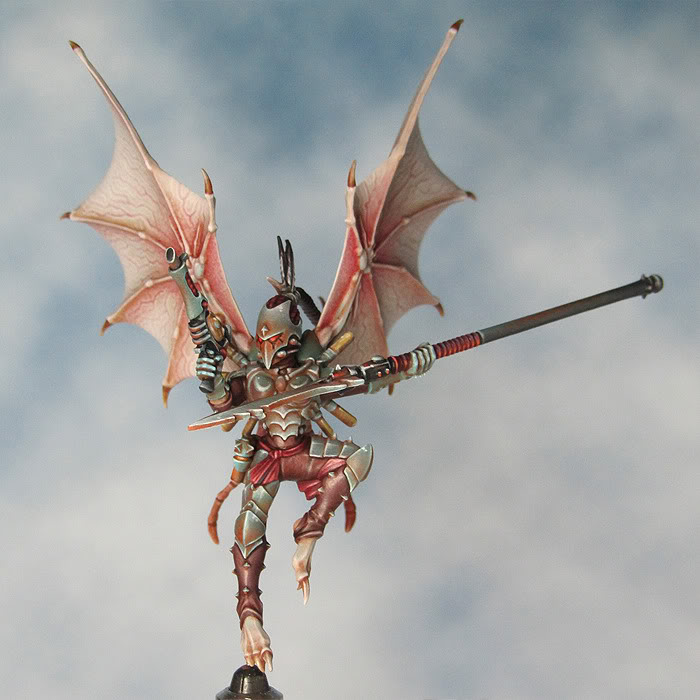
Detailed Views.
A few mercilessly enlarged pictures to illustrate my NMM technique.

The upper surfaces reflect the cooler (sky) colours and the lower ones reflect the warmer (earth) colours. The tones in between the two tend to be neutral. Highlights are kept small & sharp.

Compare the bluer mid tones on the inside of the leg to the warmer mid tones on the outside. The use of orange in the shadows helps to add to the reflective look and adds interest.

Some examples of the gold/brass effect. Notice the reflections of the ice blue colour.
wow man great blob and job :)
ReplyDeleteDave. You need to go to Golden Demon this fall, and just win it all. Your stuff from the early nineties (or was it late eighties) were major sources of inspiration to me, and the new generation needs to be shown how it's done.
ReplyDeleteThis is awesome. Looking forward to seeing this finished. You entering it into Golden Demon?
ReplyDeleteThanks guys and yes it is my intention to enter Golden Demon this year! (all going well)
ReplyDeleteI really like this, if you don't mind I'm gonna add it to a list of tutorials I'm colleting on my blog. Just a link to your page saying it's great ;)
ReplyDeleteI don't mind at all Ethelie. Thanks for the compliment.
ReplyDeleteLegendary Sproket!
ReplyDeleteIm new to the painting sceen and have been in part sucessful in basic NMM. this was very helpful and will be working from your tutorial on my next mini.
Canny CMON forum.