Thursday 26 December 2013

Chee-Chee Part 7 - Sculpting a base from Polymer clay.

Seasons Greetings!

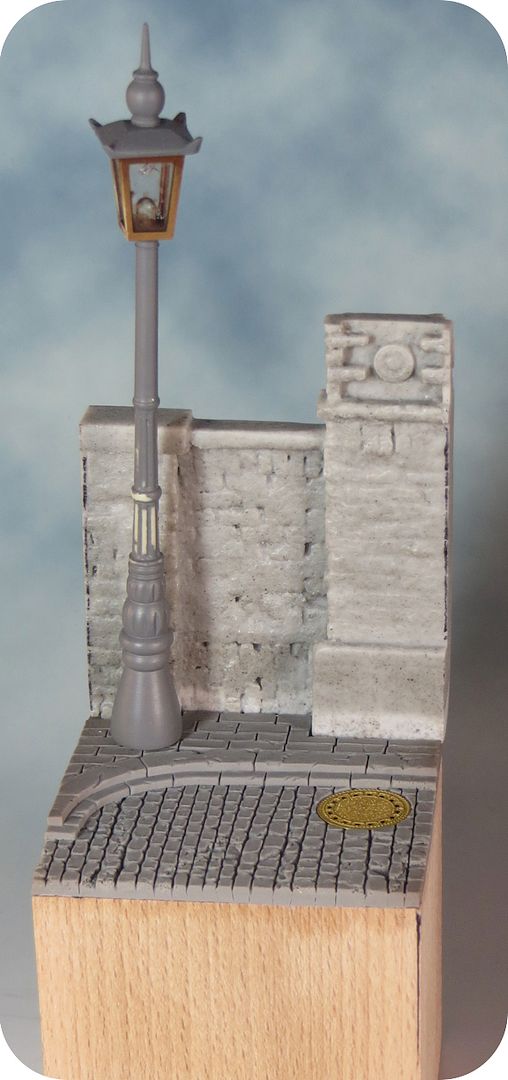
Having figured out what I'm doing for Chee-Chee's base it's time to start putting it all together. I've decided to sculpt the road and pavement/kerb out of polymer clay. I'd considered using plaster but that can be a messy business and although epoxy clay would also have been a good option I'm allergic to it. I avoid using it too often especially as I will need to use milliput later in the project.

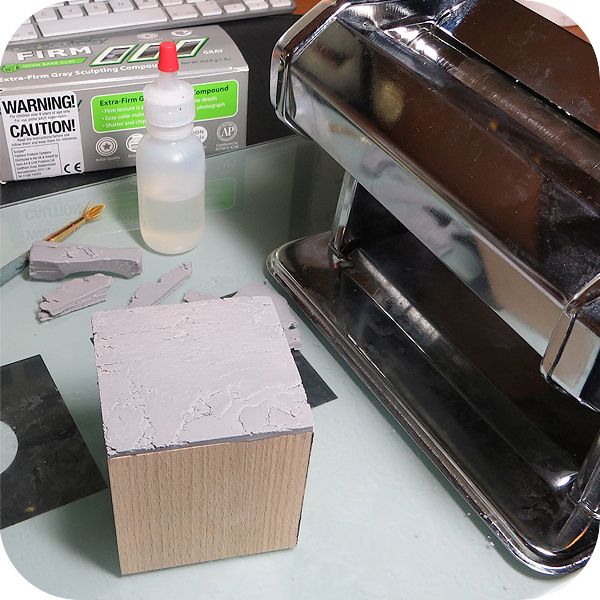
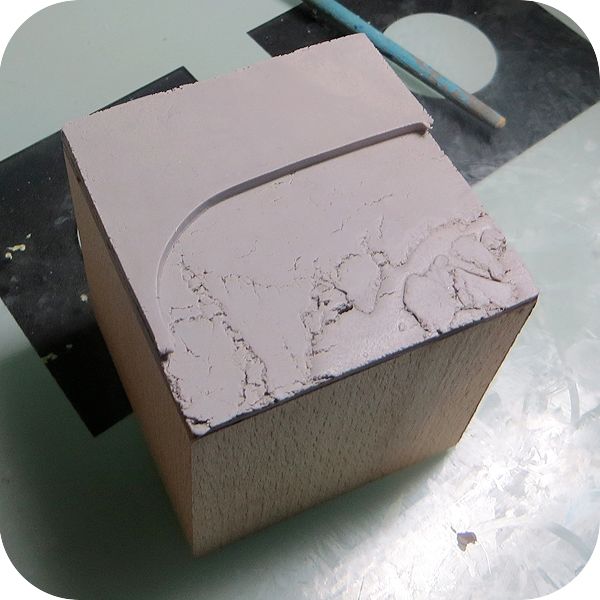
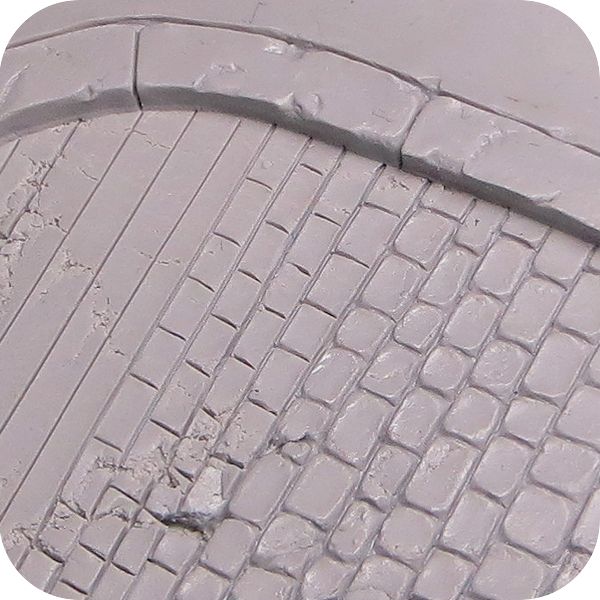
The next issue was the condition of the polymer clay. My super sculpey firm is stored in an airtight container in a cool place but after a couple of years neglect it was woefully dried out and crumbly! A few drops of sculpey softener and a lot of passes through a pasta machine (only ever used for polymer clay of course!) returned the clay to a workable condition but the crumbly clay gave me an idea. I kept back a small quantity of this to use as the top surface of the road. The cracked & crumbly surface helps to give some interest and texture. I then rolled out another, smoother, layer of smoother clay and cut it to shape for the pavement. 


To create a cobble stone texture I first cut a series of lines with a scapel and then set about adding some character and deffenition with a fine point sculpting tool. After that I rounded off the hard edges by working over the sculpted surface with a paintbrush dipped in a little isoproplyl alchohol.


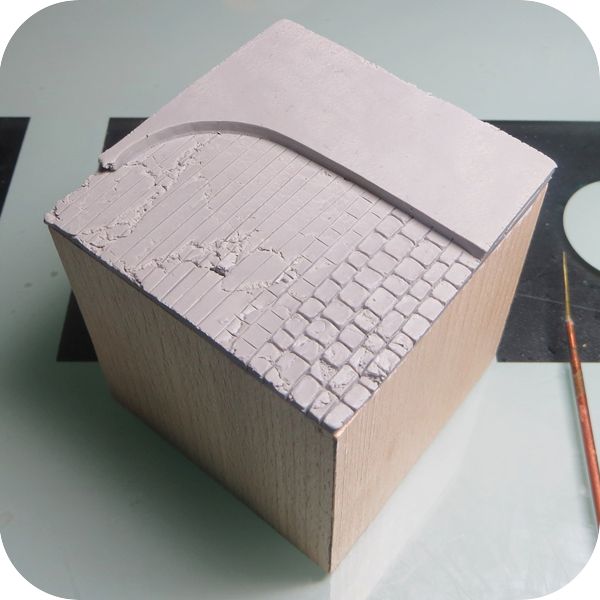
With the sculpting done I cut away the clay where the wall will go so that it won't simply sit flush on the ground surface. I also carved out an indentation ready for an eched brass drain cover. With an oven nicely preheated from roasting the Christmas ham (I kid you not) I then baked the clay to set it hard.


Next I will have to attach the wall and set about ensuring a seamless transition between all the base elements but for the time being I've photographed the first test fitting of the wall and lamp to the new base.

Tuesday 10 December 2013

Painting Chee-Chee Part 6


Well November has come and gone and I've managed to get far less painting done than I'd hoped but it's been a busy month so I've had to go with the flow. I'm hoping to get a lot of work done over the Christmas holiday (it's approaching at an alarming speed) and I'll steal whatever painting time I can in the meantime.
I have managed to get some painting done and I've finished Chee-Chee's big mecha arm. So with the exception of a few rods & cables I've mostly only got fur left to paint. Mind you that's quite a lot of only!
I've begun to resolve those areas of fur by working on the back & arms. These areas cover the extremes of the colour range in Chee-Chee's fur with the arms being almost pure black and the back being silver-grey. Both areas need a bit more work but the overall effect is becoming apparent and I'm very pleased with how it's looking.


I've also been spending a bit of time working out my designs for Chee-Chee's base. My earlier plans were for something far bigger but as time has gone on I've decided to literally scale it back. I'm still having a cobbled street, lamp post & the zoo walls but the whole thing will be a smaller & tighter composition. I think this will show off Chee-Chee to far better advantage. He will now be the dominant element of the composition as only seems right. The pics below are of a very rough test fit but they give the general idea.


Monday 18 November 2013

A distressing situation. Chee-Chee Part 6


It felt as though I'd become totally bogged down and uninspired when I was painting Chee-Chee's gun arm so I moved on to the big mecha arm with some trepidation. As it turns out my fears were without foundation and painting the mecha arm has been a pleasure and restored all my enthusiasm for this mini!

I've already had a lot of fun painting different NMM effects on Chee-Chee and the big mecha arm is giving me the opportunity to push things further and experiment with painting some damaged and distressed surfaces. With the exception of a bit of verdigris it's the first time I've attempted anything like this as I've been very focused on getting a clean smooth finish on all my recent projects. So far so good and it feels like the paint job is beginning to come together as a whole and give a unified feel to the mini without everything all looking the same.

For the most part this is down to the use of a fairly restricted colour palette. Just a couple of key colours are used for the highlights & shading and this helps to tie everything together. The palette has many similarities with those used on both the Tomb King & Scourge earlier this year so I'm glad that I chose to paint the Skink Priest in-between those projects and Chee-Chee. Switching between a saturated and more muted palette helps to keep things fresh it also stops me slipping into 'auto pilot' mode and just doing more of the same out of habit.


Monday 4 November 2013

Painting Chee-Chee. Chee-Chee Part 5

It's been a bit of a hard slog recently. There's been less time available for painting than I'd like and when I've picked up a paintbrush I've struggled to get the quality of finish I want. It's just one of those things we all have to deal with from time to time but that dosen't make it any less frustrating.

I'm having to put a lot of time into refining the paint job to get things to the level I want. That's not really a problem but it's a bit of a shift in approach after I had it so (comparatively) easy with the Skink Priest! Thankfully the extra effort feels like it's going to pay of as I'm beginning to get some pleasing results. I'd gotten a bit bogged down on the gun arm so I need to move on and work on some of the other area and not focus too much on just one part of the mini.


The slower painting progress has given me time to consider the size and composition of the
overall piece and my ideas have begun to come together. I've decided on a smaller composition than I'd first planned. I think my initial concept of the zoo walls and gate were in serious danger of overpowering the mini! I'm going with the same idea but it will be a tighter composition and Chee-Chee will be the dominant element. Which is just as it should be!

I've also had a bit of fun developing some poster artwork to go onto the zoo walls.


Monday 21 October 2013

Painting Chee-Chee. Chee-Chee Part 4

It's time for some more miniature monkey business!

There hasn't been any dramatic progress but I've worked steadily on Chee-Chee's head to improve the contrast and definition. I've also painted up the bionic eye and skull implants so the head is pretty much all done pending any final tweaks.

This mini is going to give me the opportunity to go to town with NMM effects. I want the mechanical implants to have a hotchpotch and haphazard feel as if they've been added over a number of years. This is going to give me the opportunity to paint a wide variety of finishes in order to create the look I want.

Sounds like fun to me!


Monday 14 October 2013

Painting Chee-Chee. Chee-Chee Part 3


With the Golden Demon painting frenzy over & done I can finally turn my attention to painting Chee-Chee from Infamy Miniatures.

The delay in starting gave me plenty of time to do a little research and come to some decisions about how I want to paint him. It would have been easy to go in with a black base coat and dry brush all that fur but this felt like the wrong way to go about it. Instead I've chosen a light/mid tone base colour that gives me room to go both darker & lighter in the early stages of painting. I also want to try and get a bit of colour into the mini and decided to keep my use of black to a minimum.  

Having looked a few gorilla pictures I could see that I was going to have to go very dark with the paint job. By making Chee-Chee a silver back I had a way of breaking up all that black fur and this will also be more interesting for me to paint. Something else I discovered is that some gorillas have red/orange colouring on their head. This will be another way of introducing colour and have the added benefit of drawing attention to the head/face. 

I started off with washes & glazes and gradually built up the intensity and definition. I'm using Vallejo Dark Sea Blue as my shade colour and it seems to be working out quite well. It also leaves me with the opportunity to go darker in selected areas if I need to. In addition to this I'm using a touch of purple to shade the flesh tones and this together with the red & orange tones used else where brings a lot more interest to the colour palette.

It's still early days and things will probably change as the paint job comes together but it feels like a good start. I think this is going to be a really enjoyable project. After all what's not to like about a giant, mutated, cyborg gorilla!


Tuesday 8 October 2013

The Finished Lizardmen Skink Priest

Here are the pics of my finished Skink Priest.
Winner of the Silver Award in the Warhammer single miniature category at GDUK 2013.


You can find the Skink on cool mini here: http://www.coolminiornot.com/342773?browseid=6892658

Thursday 3 October 2013

The Finished Dark Eldar Diorama

Here are the pics of my finished Dark Eldar diorama.
Winner of the Gold Award in the Diorama category and the Slayer Sword at GDUK 2013.


You can find the Diorama on cool mini here: http://www.coolminiornot.com/342470?browseid=6858398


Wednesday 2 October 2013

The Finished Dark Eldar Hellion

Well here he finally is, my finished Dark Eldar Hellion. Winner of the Gold Award in the Warhammer 40,000 single miniature category at GDUK 2013. Am I ever glad I decided to base him up and enter him!


Looking at this mini now I can see how it marks a major point in my development. The colour scheme has something of an old school feel (that is no accident) and the painting style has a cartoonish/graphic quality that is typical of my work up to this point. I'm very happy with both of those elements and feel it's with this mini that I hit my stride and regained full control of my painting technique. It's also here that I began to explore some of the newer (to me) things like texture, OSL and NMM. For me its that combination of new and old that makes the paint job work and gives it it's character.

But as happy as I am with it, this is a mini that made me think about changing the way I use colour; and so led directly to the evolution and, I hope, refinement of my painting style. The results can be seen in my Tomb King and the Dark Eldar diorama.

The Hellion is now up at cool mini here: http://www.coolminiornot.com/342336